
A little while ago we received an email from Kurt Talke, a Mechanical Engineering Ph.D. student at UCSD. He had created a LabVIEW version of the eduMIP robot. Until now LINX hasn’t been able to communicate with the Beaglebone® Blue, and this has a lot to do with the many differences between it and the supported Beaglebone Black. I looked into the eduMIP robot and found out it was a self-balancing robot,and after watching a YouTube video that showed the eduMIP robot in action we knew that we had to try it out. This post will tell you all you need to know about the eduMIP robot and the BeagleBone® Blue so you can get started with this project.
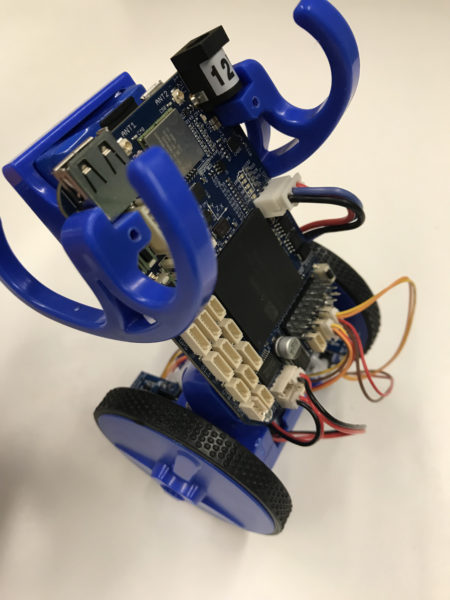
The eduMIP is a low-cost educational robotics kit, developed in a research and teaching setting in the UC SAN DIEGO COORDINATED ROBOTICS LAB, for building an extensible, open-standards-compliant, Linux-based, Mobile Inverted Pendulum (MIP) prototype. Hardware-focused Massively-Open Online Courses (MOOCs) are currently being developed which leverage these kits, targeting both introductory STEM courses (advanced high-school / college freshmen), and professional robotics courses (college senior, graduate, and beyond).
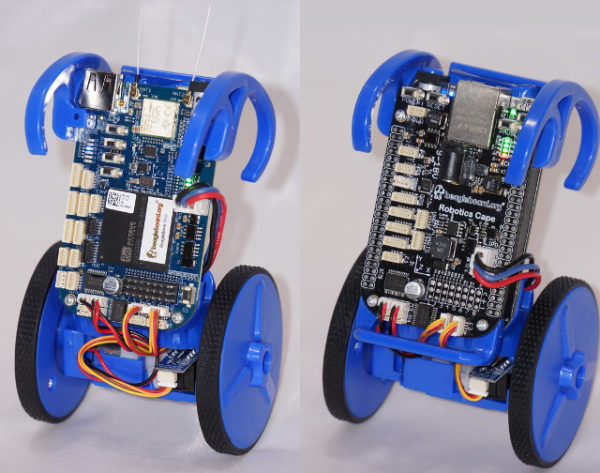
The BeagleBone® Blue is the perfect board for a kit like this. The BeagleBone® Blue is the affordable and complete robotics controller built around the popular BeagleBone® open hardware computer. Linux-enabled, Blue is community-supported and fully open-source. High-performance, flexible networking capabilities are coupled with a real-time capable Linux system and a compelling set of peripherals for building mobile robots quickly and affordably. By utilizing the pre-configured WiFi access point, starting code development is as simple as connecting a battery and opening a web browser.
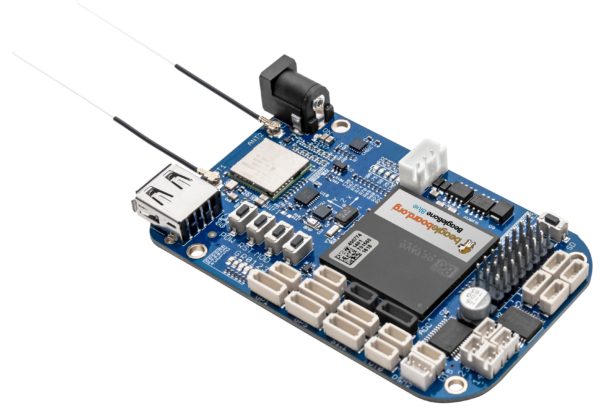
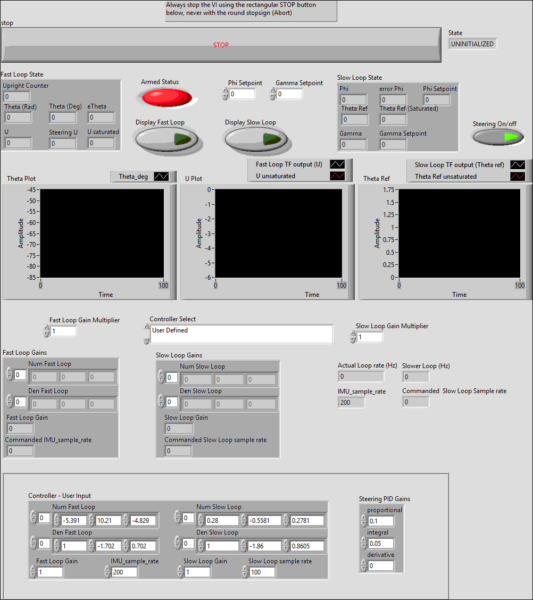
Blue has onboard 2 cell (2S) LiPo battery management with charger and battery level LEDs, 8 real-time software controlled PWM/PPM outputs for 6V servo motors or electronic-speed-controllers (ESCs), 4 PWM-enabled DC motor drivers, 4 quadrature encoder inputs, on-board sensors including a 9-axis IMU and barometer, a wide array of GPIO and serial protocol connectors including CAN,4 ADC inputs, a PC USB interface, a USB 2.0 host port, a reset button, a power button, two user configurable buttons and eleven user configurable LED indicators. Built on Octavo Systems’ System-In-Package that integrates a high-performance TI AM3358 processor, 512MB of DDR3 and power management. The BeagleBone® Blue was made for projects like this one, and setting up the robot is extremely easy with this video giving step-by-step instructions. The LabVIEW aspect is slightly more complicated but all of the steps are given in this Hackster.io project. The picture below shows the balancing VI.
Thank you for reading my blog post, and make sure to check out the Hackster.io project where we give detailed full instructions for setting this up. If you are interested in making this project yourself but don’t have the right supplies, you can purchase the BeagleBone Blue eduMIP kit here. You should also purchase LabVIEW 2014 home edition which includes everything you need to run LINX 3.0 and start making projects. Please comment with any questions or comments you may have.