
LINX provides easy to use LabVIEW VI’s for interacting with common embedded platforms like Arduino, chipKIT, and myRIO. With LINX 3.0, the software has been expanded to support the Raspberry Pi and the BeagleBone Black, enabling the boards to run LabVIEW code. LINX allows you to use the built-in sensor VIs to start getting data to your PC in seconds or use the peripheral VIs to access your devices digital I/O, analog I/O, SPI, I2C, UART, PWM and more. In this post, I will give a brief overview of how LINX works.
![]()
At its heart, LINX is a hardware abstraction layer that allows you to have a single LabVIEW interface to a variety of different hardware devices. Depending on the device, you can access it in one of two ways: Remote or Local I/O
Remote I/O
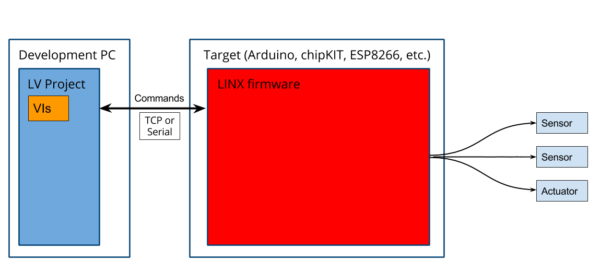 Remote I/O works by running LabVIEW VIs on the development PC. In this configuration, the LINX VIs send commands to LINX firmware running on a device connected to the development computer by a USB, WiFi, or Ethernet connection. These commands tell the firmware to perform pre-defined actions such as reading an analog input or setting a digital output high. Devices that use Remote I/O are Arduino, chipKITs, ESP8266s, and many others. Details on how the protocol works and information on specific commands is available here.
Local I/O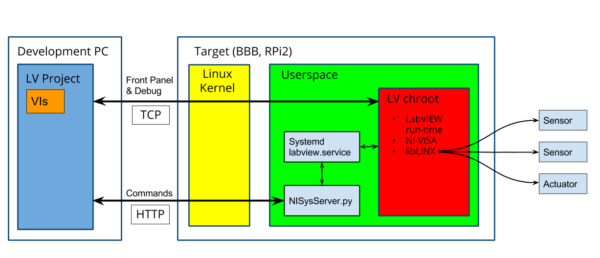
Local I/O is used on devices that can execute LabVIEW VIs directly without help from a development PC. Devices that use Local I/O are Linux-based devices like myRIO, Raspberry Pi 2/3, and BeagleBone Black.
In this configuration, VIs are written on the development PC, then deployed and run on the target via a TCP connection with the LabVIEW run-time engine running on the target. While the VIs are running on the target, debugging information and front panel values is transferred between the target and the development PC. When a VI is running on the target with live front panel data on the dev PC, this is called Interactive Mode.
The LabVIEW run-time engine on the target runs inside a chroot, which is a Linux construct that is similar to a virtual machine. This allows the LV run-time to be installed and run safely on many different Linux operating systems. LabVIEW VIs running on the target utilize the LINX firmware, compiled as a Linux shared object, in order to access I/O on the target. The LINX shared object contains the logic necessary to access I/O on the specific target board.
Local I/O with a Startup Executable
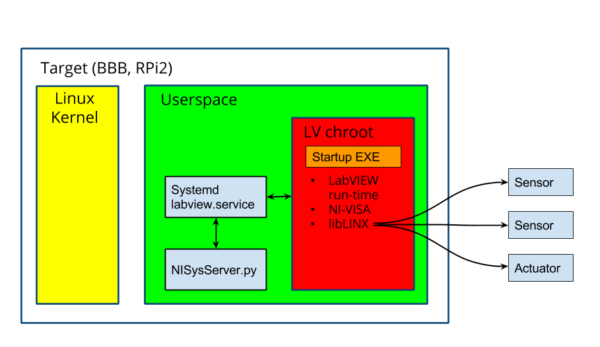
Local I/O has a final mode it can be used in via a startup executable. As shown in the diagram above, a development PC is no longer needed in this configuration, since the startup executable is run automatically when the target boots. The only difference in this mode is that the front panels are no longer visible since the development PC is not controlling the execution of the application’s VIs. This mode is “headless” in the sense that there is not a built-in user interface. Note that although startup executables are called “executable” they do not function like normal Linux programs and can’t be invoked from the command line. Creation and deployment of the startup app are controlled from the development PC.

Thank you for reading my blog post, and If you want a more technical explanation for how LINX works check out this post from Labviewmakerhub. If you are interested in trying out LabVIEW for yourself, you can purchase a copy of LabVIEW 2014 Home Edition which includes everything you will need to run LINX 3.0. Please comment below with any questions or comments you may have.
Hello,
I have been using LINX for a few months and find it very useful. However, there don’t appear to be any updates to the Github for a couple of years. Are there any plans to keep this project alive?
Thanks!
Hello,
How to implement Local I/O with a Startup Executable?
I see only Interactive Mode working
Thanks!