
I absolutely love Multisim. Let’s just get that out of the way right now. It is truly a feat of software engineering. It is quite simple and easy to use, has a massive library of components, and the amount of space you have to simulate circuits is impressive. There are a number of virtual instruments that you can use to observe your circuit, with a simple click of the mouse you can view your circuit in 3D or start your PCB layout, and you can view and print the SPICE netlist.
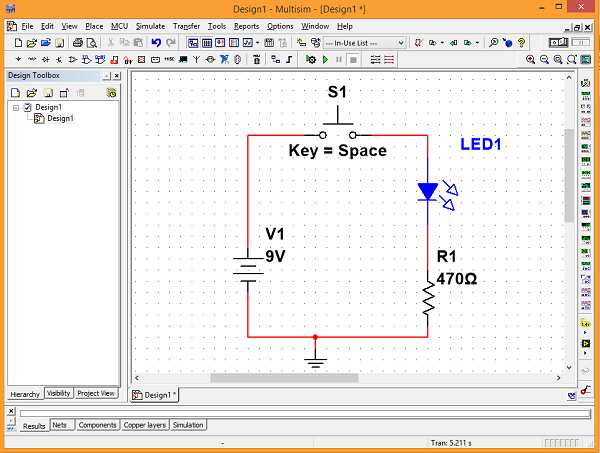
You can do something as simple as an LED driver:
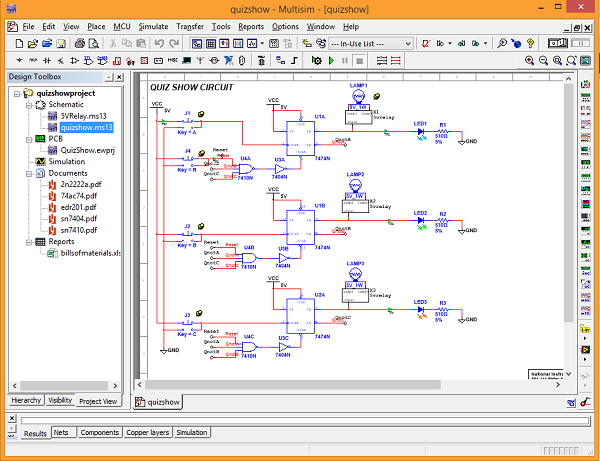
Or you can go much more complex, with multiple schematic files, PCB layout files, component datasheets, and a bill of materials, all attached to one project file, like this quiz show trigger project:
You can’t go wrong by using Multisim and for professionals or educators, you can get a bulk license and allow access to multiple users. For students, you can download the student version here.
But wait! There’s more!
Aug. 1-5 was NI Week at National Instruments headquarters in Austin, Texas. This was a platform for NI and all of it’s partners (including Digilent) to showcase new products and improvements to existing products. On Tuesday, Aug. 2, MultisimLive was officially announced. It is a browser-based circuit simulator that is compatible across most platforms, including mobile platforms. I would be lying if I said I wasn’t beyond excited to hear that. I actually got a little choked up about it, and I say that with no shame at all. That is how much I love this software, and to hear that it will be available to everybody (with limitations) just makes me smile.
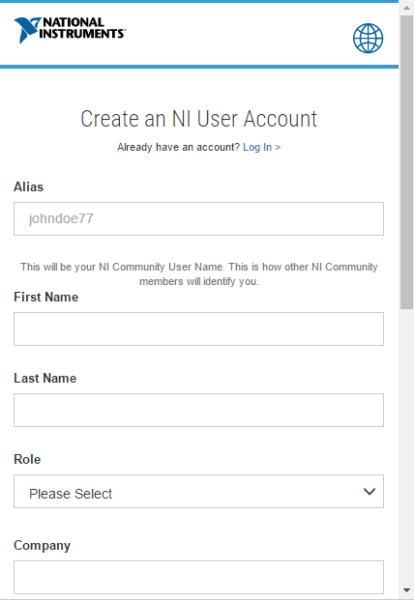
The website to sign up is beta.multisim.com. Before I begin, I should point out that I have used the Google Chrome browser for my personal experience. You have to establish an account with NI, but if you already have one you should be able to login with that. Registering a new account was one area that was a big drawback for me.
I understand the need for an account, since there are different levels of subscription, but allow me to explain my hangup. You are required to declare your profession. There is no “Hobbyist” or “Tinkerer” or “Maker” option. Why NI? Why can’t I just signup as an average person for hobby-level use? I can sign up with Accounts Payable as a professional option (at which point you require my company address) but not as a hobbyist, with no address required? I don’t understand the logic here.
One of the options for profession is Student-Undergraduate. Since that fits me, I clicked on that. The system then asks for my school, and then my school address. A street address for my school? Really? I have no idea what the street address of Washington State University is, since it covers several hundred acres of land, encompassing dozens of buildings and streets. I went to the WSU website to try and find a street address for the school, and the website basically laughed at me. WSU has no simple street address, without which I couldn’t continue to register. After getting so excited about it, you can imagine my frustration. However, since I am an intern at Digilent Inc., I was able to register as other-than-student as a Digilent employee and using the Digilent address. Since all blocks on the form must be filled in order to register an account, there was no way around this. Long story short, the registration process is a bit too involved and rigid in my opinion and could turn people away just on that alone.
Luckily, once you get past Zuul, the rest of the site is nothing like the Temple of Gozer. The layout is simple, without too many options to confuse and distract. There are two levels of subscription, Free and Premium.
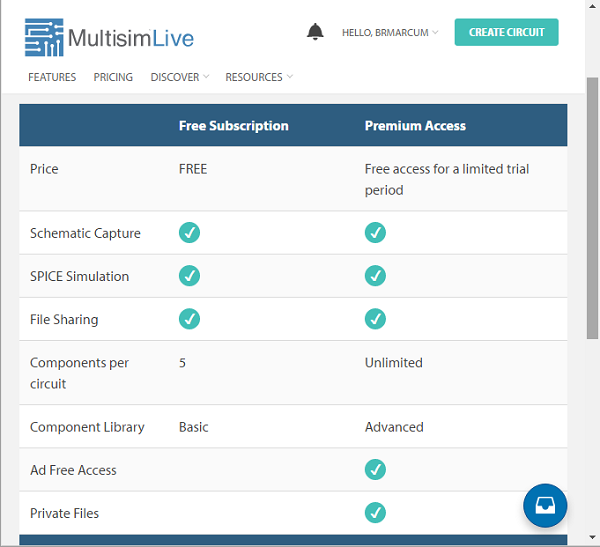
Right now, premium access is offered for free for a limited time, and I highly recommend you take advantage of it while you can. I couldn’t find anywhere that said how long that will last, or even what the price will be after that, so we’ll just have to see once that information is released.
From the main screen there is a button that says “See how it works”, which will take you to a “Get Started” page. I was expecting more interaction with this, maybe some how-to videos or something, but this it.
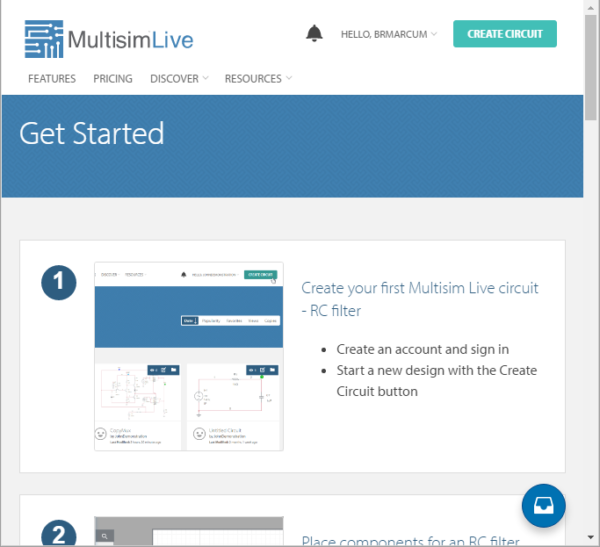
The instructions are there in words, but there is only one picture per step, and with little more than one instruction per step, I think some additional information is needed. But my plan is to do a simple Instructable tutorial anyway, so hopefully that will help to fill the gaps!
Enough of the fluff, let’s build a circuit! How about a simple passive RC low-pass filter? As I mentioned above, I will do a more in depth tutorial as an Instructable, so I will highlight more of the interface here than the actual steps involved.
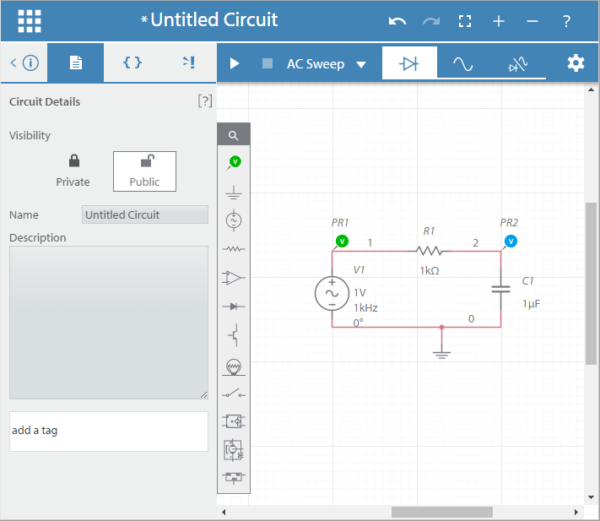
The schematic page is large and simple, with the component list on the left, which is fairly extensive. Specific manufactured parts are not available, as with Multisim desktop, but you are simulating here anyway. That being said, if you choose, say a BJT for example, the system will load the preset component parameters. But by clicking on the ![]() at the top right while you have the component highlighted, you can edit most of the internal performance parameters of most of the components. Many component parameters can be edited right from the schematic just by clicking on the specific parameter, e.g. 1 kΩ for the resistor, and you can edit them during simulation so you can see how it changes real-time. The edit-ability (yep, new word!) of components is a great feature and extremely easy to find and use.
at the top right while you have the component highlighted, you can edit most of the internal performance parameters of most of the components. Many component parameters can be edited right from the schematic just by clicking on the specific parameter, e.g. 1 kΩ for the resistor, and you can edit them during simulation so you can see how it changes real-time. The edit-ability (yep, new word!) of components is a great feature and extremely easy to find and use.
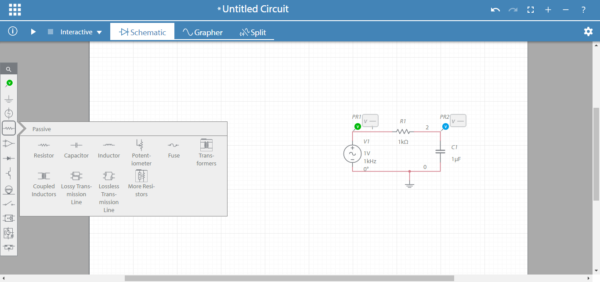
In order to simulate the behavior of the circuit, we need to add probes, of which there are several options. There are no tool simulators, like the multimeter or oscilloscope in Multisim, but the probe options available are more than adequate and similar to the probe functions in the newest version of Multisim.
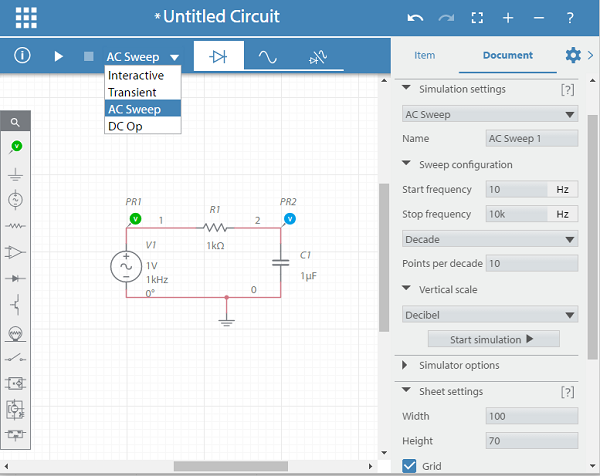
There are also several types of simulations available, which should be no surprise. You can choose from Interactive, Transient, AC Sweep, or DC Op. These options can be accessed by either clicking on ![]() at the top right and making sure that the Document tab is highlighted, or by clicking on the
at the top right and making sure that the Document tab is highlighted, or by clicking on the ![]() tab at the top of the window. By clicking on the gear image, you are able to edit the simulation parameters like I have done for the RC filter circuit.
tab at the top of the window. By clicking on the gear image, you are able to edit the simulation parameters like I have done for the RC filter circuit.
Click on ![]() to start the simulation. The simulation results should open automatically, but if not you can simply click one of these options
to start the simulation. The simulation results should open automatically, but if not you can simply click one of these options ![]() to easily switch between the two views, or go for a split screen view. As with component parameter editing, this can also be done in real-time while a simulation is running.
to easily switch between the two views, or go for a split screen view. As with component parameter editing, this can also be done in real-time while a simulation is running.
The Grapher image is easy to read and clean, and by once again clicking on ![]() again, you can edit the graph window parameters to really see what is going on.
again, you can edit the graph window parameters to really see what is going on.
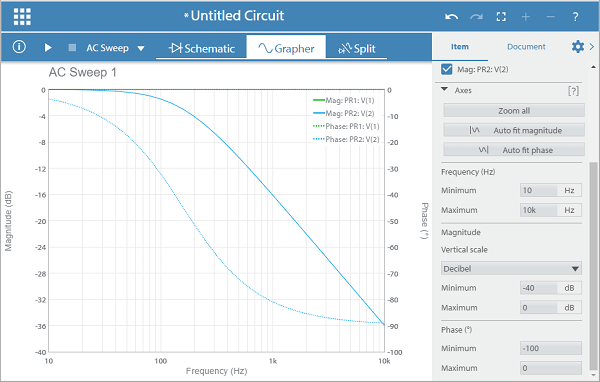
I already know that the cutoff frequency for this circuit should be 1/(1 kΩ * 1 μF * 2π) = 159.15 Hz. At this point my gain should drop by -3 dB and my phase should be -45°. By zooming in on the graph, we can see that our circuit has performed as expected.
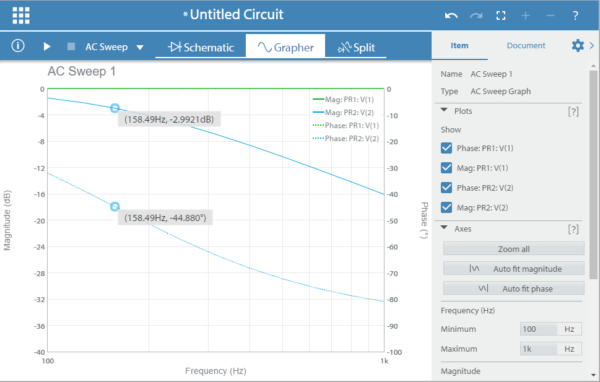
Unfortunately, the Grapher won’t let you trace the plot very well to get an exact value. There is no option to enter in an exact value of your choosing and then have it display the calculated value from the plot at that exact point. It would definitely be nice to see this as an option in later versions. 158 Hz was as close as I could get, but luckily it was close enough to illustrate the point.
Now that we’re done with our circuit, we can click on ![]() at the top left to access the information pane, where we can edit circuit details like the name and description of our circuit
at the top left to access the information pane, where we can edit circuit details like the name and description of our circuit ![]() , the SPICE netlist
, the SPICE netlist ![]() , or a warning list
, or a warning list ![]() , should any warnings arise during simulation.
, should any warnings arise during simulation.
By clicking ![]() at the very top left, we can save, open a new circuit, etc.
at the very top left, we can save, open a new circuit, etc.
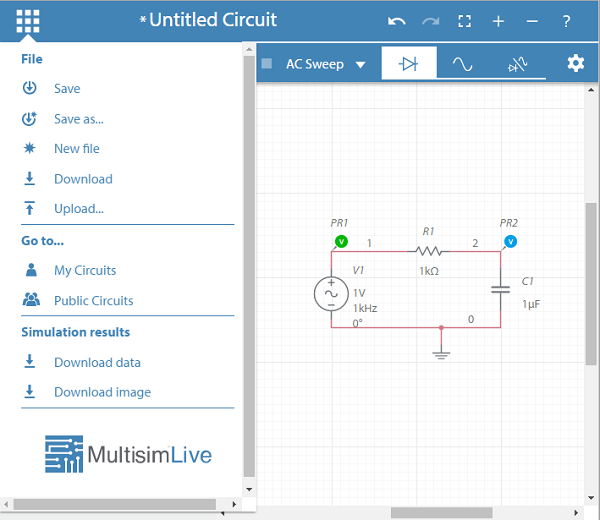
From your My Circuits page, circuits are easily managed, with no hassle for editing or deleting files when needed. You can choose to share your files publicly or keep them private. Or start your own group as well and collaborate with others on the same project. There are a number of circuits already on the public server, so you can go through and get ideas from others and build off of them to make your own awesome.
I mentioned that MultisimLive is also accessible on mobile platforms. I’ve focused on the desktop version in this blog, but I’m pleased to say that the mobile version (Samsung Galaxy Note4 with Chrome browser) is exactly like the desktop, with no differences or issues that I found.
Overall, MulitsimLive is a fantastic and user-friendly product. Apart from the registration frustration I experienced, I couldn’t be more pleased. The program is currently in it’s beta form, so I expect to see some changes in the next few months. But even as it is now, it’s awesome. Well done NI.

Now it is worthless. Thanks for nothing digilent.