
Who doesn’t love interactive LEDs? This project started because I wanted to make a simple circuit that I could later move on to a printed circuit board (PCB) that I designed myself. (The original goal was to learn PCB design and layout.) This idea was given to me by my manager, Larissa, and was inspired by Evil Mad Science’s Octolively. Being an analog enthusiast, I came up with my own design that doesn’t use any ICs. You can see it in action in the GIF below.
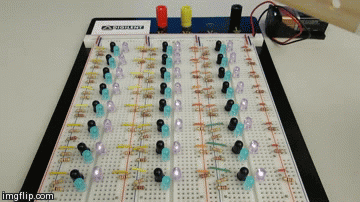
How does it work? Each LED is grouped with an infrared (IR) LED and a photo-transistor. When a photo-transistors “sees” a certain wavelength of light, it is gated and turns on, allowing current to flow through it. I chose an IR LED that emits the same wavelength of light that the photo-transistor is configured to receive. As an object moves over the LEDs, the IR light coming from the IR LED reflects off of the object and back to the circuit. The photo-transistor receives the reflected IR light and turns on allowing current to flow through it to the blue LED turning it on. If you want to build one yourself, check out this Instructable.
As I mentioned, the plan was to eventually move this circuit to a PCB. The design process went well and the circuit worked great on the PCB. I’ll be doing another post on my design process and the finished project soon, so keep checking back!
3 Comments on “Proximity-Sensing LEDs Part 1: On a Breadboard”